· Visual Basic is a tool that allows you to develop Windows (Graphic User Interface - GUI) applications. The applications have a familiar appearance to the user.
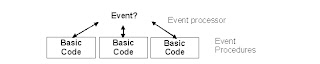
· Visual Basic is event-driven, meaning code remains idle until called upon to respond to some event (button pressing, menu selection, ...). Visual Basic is governed by an event processor. Nothing happens until an event is detected. Once an event is detected, the code corresponding to that event (event procedure) is executed. Program control is then returned to the event processor.
 · Some Features of Visual Basic
1. Full set of objects - you 'draw' the application
2. Lots of icons and pictures for your use
3. Response to mouse and keyboard actions
4. Clipboard and printer access
5. Full array of mathematical, string handling, and graphics functions
6. Can handle fixed and dynamic variable and control arrays
7. Sequential and random access file support
8. Useful debugger and error-handling facilities
9. Powerful database access tools
10. ActiveX support
11. Package & Deployment Wizard makes distributing your applications simple
Visual Basic 6.0 versus Other Versions of Visual Basic
· The original Visual Basic for DOS and Visual Basic For Windows were introduced in 1991.
· Visual Basic 3.0 (a vast improvement over previous versions) was released in 1993.
· Visual Basic 4.0 released in late 1995 (added 32 bit application support).
· Visual Basic 5.0 released in late 1996. New environment, supported creation of ActiveX controls, deleted 16 bit application support.
· And, now Visual Basic 6.0 - some identified new features of Visual Basic 6.0:
1. Faster compiler
2. New ActiveX data control object
3. Allows database integration with wide variety of applications
4. New data report designer
5. New Package & Deployment Wizard
6. Additional internet capabilites
16 Bits versus 32 Bits
· Applications built using the Visual Basic 3.0 and the 16 bit version of Visual Basic 4.0 will run under Windows 3.1, Windows for Workgroups, Windows NT, or Windows 95
· Applications built using the 32 bit version of Visual Basic 4.0, Visual Basic 5.0 and Visual Basic 6.0 will only run with Windows 95 or Windows NT (Version 3.5.1 or higher).
· In this class, we will use Visual Basic 6.0 under Windows 95, recognizing such applications will not operate in 16 bit environments.
Structure of a Visual Basic Application
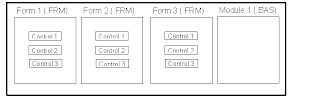 Application (Project) is made up of:
Forms - Windows that you create for user interface
Controls - Graphical features drawn on forms to allow user interaction (text boxes, labels, scroll bars, command buttons, etc.) (Forms and Controls are objects.)
Properties - Every characteristic of a form or control is specified by a property. Example properties include names, captions, size, color, position, and contents. Visual Basic applies default properties. You can change properties at design time or run time.
Methods - Built-in procedure that can be invoked to impart some action to a particular object.
Event Procedures - Code related to some object. This is the code that is executed when a certain event occurs.
General Procedures - Code not related to objects. This code must be invoked by the application.
Modules - Collection of general procedures, variable declarations, and constant definitions used by application.
IDE Components
The Visual Basic environmentThe Visual Basic environment is made up of several windows. The initial appearance of the windows on your screen will depend on the way your environment has been set up.
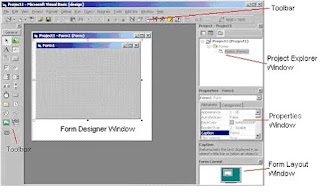 Figure 2-1
The tool bar
The Visual Basic tool bar functions like the tool bar in any other Microsoft application. It provides shortcuts for many of the common operating commands. It also shows you the dimensions and location of the form currently being designed.

Figure 2-2
The tool box
The tool box gives you access to the controls that you use on a form. A control is an object such as a button, label or grid. Controls are used on forms to display output or get input. Each control appears as a button in the tool box. If the control you are looking for is not in the toolbox, select Components from the Project menu. If the tool box is not displayed on your screen, or if at any time during the exercises you close it, choose Toolbox from the View menu.
The form designer window
This window is where you design the forms that make up your user interface.
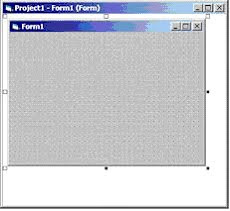 Figure 2-4
If the form designer window is not displayed on your screen, or if at any time during the exercises you close it, choose Object from the View menu.
The properties window
The properties window lists all the properties a control has and their value. The default value of a property can be changed by setting the property value using the properties window when you design your application or changed by assigning a new value in code while your application is running.
If the properties window is not displayed on your screen, or if at any time during the exercises you close it, choose Properties Window from the View menu.
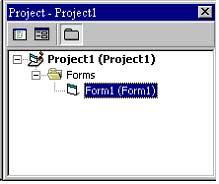
The project explorer windowA project is a collection of the forms and code that make up an application. Each form in your application is represented by a file in the project explorer window.
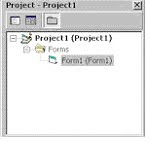 Figure 2-5
A form file contains both the description of the screen layout for the form and the program code associated with it. If the project explorer window is not displayed on your screen, or if at any time during the exercises you close it, choose Project Explorer from the View menu.
The form layout window
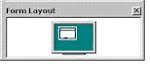 You may wish to close the form layout window to allow more space for the properties window. To open the window again, select Form Layout Window from the View menu.
Steps in Developing Application
· There are three primary steps involved in building a Visual Basic application:
1. Draw the user interface
2. Assign properties to controls
3. Attach code to controls
We’ll look at each step.
Drawing the User Interface and Setting Properties
· Visual Basic operates in three modes.
Design mode - used to build application
Run mode - used to run the application
Break mode - application halted and debugger is available
We focus here on the design mode.
· Six windows appear when you start Visual Basic.
* The Main Window consists of the title bar, menu bar, and toolbar. The title bar indicates the project name, the current Visual Basic operating mode, and the current form. The menu bar has drop-down menus from which you control the operation of the Visual Basic environment. The toolbar has buttons that provide shortcuts to some of the menu options. The main window also shows the location of the current form relative to the upper left corner of the screen (measured in twips) and the width and length of the current form.

*The Form Window is central to developing Visual Basic applications. It is where you draw your application.

* The Toolbox is the selection menu for controls used in your application. * The Properties Window is used to establish initial property values for objects. The drop-down box at the top of the window lists all objects in the current form. Two views are available: Alphabetic and Categorized. Under this box are the available properties for the currently selected object.

* The Form Layout Window shows where (upon program execution) your form will be displayed relative to your monitor’s screen:

* The Project Explorer Window displays a list of all forms and modules making up your application. You can also obtain a view of the Form or Code windows (window containing the actual Basic coding) from the Project window.
· As mentioned, the user interface is ‘drawn’ in the form window. There are two ways to place controls on a form:
1. Double-click the tool in the toolbox and it is created with a default size on the form. You can then move it or resize it.
2. Click the tool in the toolbox, then move the mouse pointer to the form window. The cursor changes to a crosshair. Place the crosshair at the upper left corner of where you want the control to be, press the left mouse button and hold it down while dragging the cursor toward the lower right corner. When you release the mouse button, the control is drawn.
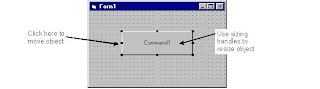
· To move a control you have drawn, click the object in the form window and drag it to the new location. Release the mouse button.
· To resize a control, click the object so that it is select and sizing handles appear. Use these handles to resize the object.
Setting Form Properties
· Each form and control has properties assigned to it by default when you start up a new project. There are two ways to display the properties of an object. The first way is to click on the object (form or control) in the form window. Then, click on the Properties Window or the Properties Window button in the tool bar. The second way is to first click on the Properties Window. Then, select the object from the Object box in the Properties Window. Shown is the Properties Window for the stopwatch application:

The drop-down box at the top of the Properties Window is the Object box. It displays the name of each object in the application as well as its type. This display shows the Form object. The Properties list is directly below this box. In this list, you can scroll through the list of properties for the selected object. You may select a property by clicking on it. Properties can be changed by typing a new value or choosing from a list of predefined settings (available as a drop down list). Properties can be viewed in two ways: Alphabetic and Categorized.
A very important property for each object is its name. The name is used by Visual Basic to refer to a particular object in code.
· A convention has been established for naming Visual Basic objects. This convention is to use a three letter prefix (depending on the object) followed by a name you assign. A few of the prefixes are (we’ll see more as we progress in the class):
Object Prefix Example
Form frm frmWatch
Command Button cmd, btn cmdExit, btnStart
Label lbl lblStart, lblEnd
Text Box txt txtTime, txtName
Menu mnu mnuExit, mnuSave
Check box chk chkChoice
· Object names can be up to 40 characters long, must start with a letter, must contain only letters, numbers, and the underscore (_) character. Names are used in setting properties at run time and also in establishing procedure names for object events.
Setting Properties at Run Time
· You can also set or modify properties while your application is running. To do this, you must write some code. The code format is:
ObjectName.Property = NewValue
Such a format is referred to as dot notation. For example, to change the BackColor property of a form name frmStart, we'd type:
frmStart.BackColor = BLUE
How Names are Used in Object Events
· The names you assign to objects are used by Visual Basic to set up a framework of event-driven procedures for you to add code to. The format for each of these subroutines (all object procedures in Visual Basic are subroutines) is:
Sub ObjectName_Event (Optional Arguments)
.
.
End Sub
· Visual Basic provides the Sub line with its arguments (if any) and the End Sub statement. You provide any needed code.
Example
Stopwatch Application - Setting Properties
1. Set properties of the form, three buttons, and six labels:
Form1:
BorderStyle 1-Fixed Single
Caption Stopwatch Application
Name frmStopWatch
Command1:
Caption -&Start Timing
Name -cmdStart
Command2:
Caption- &End Timing
Name- cmdEnd
Command3:
Caption -E&xit
Name -cmdExit
Label1:
Caption- Start Time
Label2:
Caption -End Time
Label3:
Caption- Elapsed Time
Label4:
BorderStyle 1-Fixed Single
Caption- [Blank]
Name- lblStart
Label5:
BorderStyle 1-Fixed Single
Caption -[Blank]
Name- lblEnd
Label6:
BorderStyle 1-Fixed Single
Caption -[Blank]
Name- lblElapsed
In the Caption properties of the three command buttons, notice the ampersand (&). The ampersand precedes a button's access key. That is, in addition to clicking on a button to invoke its event, you can also press its access key (no need for a mouse). The access key is pressed in conjunction with the Alt key. Hence, to invoke 'Begin Timing', you can either click the button or press Alt+B. Note in the button captions on the form, the access keys appear with an underscore (_).
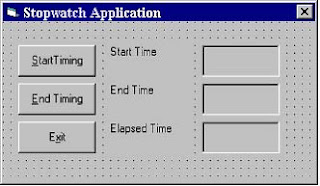
2. Your form should now look something like this:
What are events?Each Visual Basic object has a set of events. Events are actions which Visual Basic can detect and respond to. For example, a user clicking on a command button on a form will generate a click event for that button.
When an event is generated Visual Basic will run any code you have entered for that event.
The Form Object
· The Form is where the user interface is drawn. It is central to the development of Visual Basic applications.
· Form Properties:
Appearance Selects 3-D or flat appearance.
BackColor Sets the form background color.
BorderStyle Sets the form border to be fixed or sizeable.
Caption Sets the form window title.
Enabled If True, allows the form to respond to mouse and keyboard events; if False, disables form.
Font Sets font type, style, size.
ForeColor Sets color of text or graphics.
Picture Places a bitmap picture in the form.
Visible If False, hides the form.
EVENT NAME DESCRIPTION
Change: Indicates that the content is changed. When it occurs depends on the control. Applies to ComboBox, Grid, List controls, label, text box
Click :Occurs when the user presses and releases a mouse button over an object.
Dblclick: Occurs when the user clicks it twice at a stretch with the mouse
DragDrop: Occurs when a drag-and-drop operation is completed.
DragOver : Occurs when a drag-and-drop operation is in progress
GotFocus : Occurs when an object receives the focus.
KeyDownKeyUp : occurs when the user presses (Key down) or releases (Key Up) a key while an object has the focus
Key Press: Occurs when the user presses and releases an ANSI key.
Load: Occurs when form is loaded. Applies to Form, MDI Form.
LostFocus: Occurs when an object loses the focus.
Mouse Move: Occurs when the user moves the mouse.
Mouse UP , Mouse Down: Occur when the user presses (MouseDown) or releases (MouseUp) a mouse button.
· Form Methods:
Cls Clears all graphics and text from form. Does not clear any objects.
Print Prints text string on the form.
Examples
frmExample.Cls ' clears the form
frmExample.Print "This will print on the form"
Variables
· Variables are used by Visual Basic to hold information needed by your application. Rules used in naming variables:
Þ No more than 40 characters
Þ They may include letters, numbers, and underscore (_)
Þ The first character must be a letter
Þ You cannot use a reserved word (word needed by Visual Basic)
Visual Basic Data Types
Data Type Suffix
Boolean None
Integer %
Long (Integer) &
Single (Floating) !
Double (Floating) #
Currency @
Date None
Object None
String $
Variant None
Variable Declaration
· There are three ways for a variable to be typed (declared):
1. Default
2. Implicit
3. Explicit
· If variables are not implicitly or explicitly typed, they are assigned the variant type by default. The variant data type is a special type used by Visual Basic that can contain numeric, string, or date data.
To implicitly type a variable, use the corresponding suffix shown above in the data type table. For example,
TextValue$ = "This is a string"
creates a string variable, while
Amount% = 300
creates an integer variable.
· There are many advantages to explicitly typing variables. Primarily, we insure all computations are properly done, mistyped variable names are easily spotted, and Visual Basic will take care of insuring consistency in upper and lower case letters used in variable names. Because of these advantages, and because it is good programming practice, we will explicitly type all variables.
· To explicitly type a variable, you must first determine its scope. There are four levels of scope:
Þ Procedure level
Þ Procedure level, static
Þ Form and module level
Þ Global level
· Within a procedure, variables are declared using the Dim statement:
Dim MyInt as Integer
Dim MyDouble as Double
Dim MyString, YourString as String
Procedure level variables declared in this manner do not retain their value once a procedure terminates.
· To make a procedure level variable retain its value upon exiting the procedure, replace the Dim keyword with Static:
Static MyInt as Integer
Static MyDouble as Double
· Form (module) level variables retain their value and are available to all procedures within that form (module). Form (module) level variables are declared in the declarations part of the general object in the form's (module's) code window. The Dim keyword is used:
Dim MyInt as Integer
Dim MyDate as Date
· Global level variables retain their value and are available to all procedures within an application. Module level variables are declared in the declarations part of the general object of a module's code window. (It is advisable to keep all global variables in one module.) Use the Global keyword:
Global MyInt as Integer
Global MyDate as Date
· What happens if you declare a variable with the same name in two or more places? More local variables shadow (are accessed in preference to) less local variables. For example, if a variable MyInt is defined as Global in a module and declared local in a routine MyRoutine, while in MyRoutine, the local value of MyInt is accessed. Outside MyRoutine, the global value of MyInt is accessed.
Constants
Constants store values like variables, but as the name implies, those values remain constant throughout the execution of an application
Creating your own Constants
Syntax
[public Private ] Const constantname [ As type ] = expression
eg.
Const pi=3.1415926
Dim rad = val(text1.text)
Cir=2 * pi * rad
Scope of a Constant
By declaring a constant in the declarations section of a form, standard, or class module, rather than within a procedure, the Constant will be available to all the procedures in the module.
By declaration a constant using the Public keyword, it is available throughout the application.
Declaring a constant in a procedure will be available to that procedure only
Converting Data Types
Visual Basic provides functions to convert one data type values into another data types.
Conversion function Converts an expression to
Cbool Boolean
Cbyte Byte
Ccur Currency
Cdate Date
CDbl Double
Cint Integer
CLng Long
CSng Single
CStr String
Cvar Variant
CVErr Error
Arrays
An array is a set of similar items. All items in an array have the same name and are identified by an index.
Syntax
Dim Varname [(subscripts])] as [New] type [,varname …]
Eg.
Dim num (10) as integer
Dim x(10 to 20) as integer
Quick Primer on Saving Visual Basic Applications:
When saving Visual Basic applications, you need to be concerned with saving both the forms (.FRM) and modules (.BAS) and the project file (.VBP). In either case, make sure you are saving in the desired directory. The current directory is always displayed in the Save window. Use standard Windows techniques to change the current directory.
There are four Save commands available under the File menu in Visual Basic:
Save [Form Name] Save the currently selected form or module with the current name. The selected file is identified in the Project window.
Save [Form Name] As Like Save File, however you have the option to change the file name
Save Project Saves all forms and modules in the current project using their current names and also saves the project file.
Save Project As Like Save Project, however you have the option to change file names. When you choose this option, if you have not saved your forms or modules, you will also be prompted to save those files. I always use this for new projects.
Exercise
Calendar / Time Display
Design a window that displays the current month, day, and year. Also, display the current time, updating it every second (look into the Timer control). Make the window look something like a calendar page. Play with object properties to make it pretty.
My Solution:
Form:

Properties:
Form frmCalendar:
Caption = My Calendar
BorderStyle = 1 - Fixed Single
Timer timDisplay:
Interval = 1000
Label lblDay:
Caption = Sunday
FontName = Times New Roman
FontBold = True
FontSize = 24
Label lblTime:
Caption = 00:00:00 PM
FontName = Times New Roman
FontBold = True
FontSize = 24
Label lblYear:
Alignment = 2 - Center
Caption = 1998
FontName = Times New Roman
FontBold = True
FontSize = 24
Label lblNumber:
Alignment = 2 - Center
Caption = 31
FontName = Arial
FontBold = True
FontSize = 72
Label lblMonth:
Alignment = 2 - Center
Caption = March
FontName = Times New Roman
FontBold = True
FontSize = 24
Code:
General Declarations:
Option Explicit
timDisplay Timer Event:
Private Sub timDisplay_Timer()
Dim Today As Variant
Today = Now
lblDay.Caption = Format(Today, "dddd")
lblMonth.Caption = Format(Today, "mmmm")
lblYear.Caption = Format(Today, "yyyy")
lblnumber.Caption = Format(Today, "d")
lblTime.Caption = Format(Today, "h:mm:ss ampm")
End Sub
A Brief History of Basic
· Language developed in early 1960's at Dartmouth College:
B (eginner's)
A (All-Purpose)
S (Symbolic)
I (Instruction)
C (Code)
· Answer to complicated programming languages (FORTRAN, Algol, Cobol ...). First timeshare language.
· In the mid-1970's, two college students write first Basic for a microcomputer (Altair) - cost $350 on cassette tape. You may have heard of them: Bill Gates and Paul Allen!
· Every Basic since then essentially based on that early version. Examples include: GW-Basic, QBasic, QuickBasic.
· Visual Basic was introduced in 1991.
Visual Basic Statements and Expressions
· The simplest statement is the assignment statement. It consists of a variable name, followed by the assignment operator (=), followed by some sort of expression.
Examples:
StartTime = Now
Explorer.Caption = "Captain Spaulding"
BitCount = ByteCount * 8
Energy = Mass * LIGHTSPEED ^ 2
NetWorth = Assets - Liabilities
The assignment statement stores information.
· Statements normally take up a single line with no terminator. Statements can be stacked by using a colon (:) to separate them. Example:
StartTime = Now : EndTime = StartTime + 10
(Be careful stacking statements, especially with If/End If structures. You may not get the response you desire.)
· If a statement is very long, it may be continued to the next line using the continuation character, an underscore (_). Example:
Months = Log(Final * IntRate / Deposit + 1) _
/ Log(1 + IntRate)
· Comment statements begin with the keyword Rem or a single quote ('). For example:
Rem This is a remark
' This is also a remark
x = 2 * y ' another way to write a remark or comment
You, as a programmer, should decide how much to comment your code. Consider such factors as reuse, your audience, and the legacy of your code.
Visual Basic Operators
· The simplest operators carry out arithmetic operations. These operators in their order of precedence are:
Operator Operation
^ Exponentiation
* / Multiplication and division
\ Integer division (truncates)
Mod Modulus
+ - Addition and subutraction
· Parentheses around expressions can change precedence.
· To concatentate two strings, use the & symbol or the + symbol:
lblTime.Caption = "The current time is" & Format(Now, “hh:mm”)
txtSample.Text = "Hook this “ + “to this”
· There are six comparison operators in Visual Basic:
Operator Comparison
> Greater than
< Less than
>= Greater than or equal to
<= Less than or equal to
= Equal to
<> Not equal to
· The result of a comparison operation is a Boolean value (True or False).
· We will use three logical operators
Operator Operation
Not Logical not
And Logical and
Or Logical or
· The Not operator simply negates an operand.
· The And operator returns a True if both operands are True. Else, it returns a False.
· The Or operator returns a True if either of its operands is True, else it returns a False.
· Logical operators follow arithmetic operators in precedence.
Visual Basic Functions
· Visual Basic offers a rich assortment of built-in functions. The on-line help utility will give you information on any or all of these functions and their use. Some examples are:
Function Value Returned
Abs Absolute value of a number
Asc ASCII or ANSI code of a character
Chr Character corresponding to a given ASCII or ANSI code
Cos Cosine of an angle
Date Current date as a text string
Format Date or number converted to a text string
Left Selected left side of a text string
Len Number of characters in a text string
Mid Selected portion of a text string
Now Current time and date
Right Selected right end of a text string
Rnd Random number
Sin Sine of an angle
Sqr Square root of a number
Str Number converted to a text string
Time Current time as a text string
Timer Number of seconds elapsed since midnight
Val Numeric value of a given text string
A Closer Look at the Rnd Function
· In writing games and learning software, we use the Rnd function to introduce randomness. This insures different results each time you try a program. The Visual Basic function Rnd returns a single precision, random number between 0 and 1 (actually greater than or equal to 0 and less than 1). To produce random integers (I) between Imin and Imax, use the formula:
I = Int((Imax - Imin + 1) * Rnd) + Imin
· The random number generator in Visual Basic must be seeded. A Seed value initializes the generator. The Randomize statement is used to do this:
Randomize Seed
If you use the same Seed each time you run your application, the same sequence of random numbers will be generated. To insure you get different numbers every time you use your application (preferred for games), use the Timer function to seed the generator:
Randomize Timer
Place this statement in the Form_Load event procedure.
· Examples:
To roll a six-sided die, the number of spots would be computed using:
NumberSpots = Int(6 * Rnd) + 1
To randomly choose a number between 100 and 200, use:
Number = Int(101 * Rnd) + 100
Visual Basic Symbolic Constants
· Many times in Visual Basic, functions and objects require data arguments that affect their operation and return values you want to read and interpret. These arguments and values are constant numerical data and difficult to interpret based on just the numerical value. To make these constants more understandable, Visual Basic assigns names to the most widely used values - these are called symbolic constants. Appendix I lists many of these constants.
· As an example, to set the background color of a form named frmExample to blue, we could type:
frmExample.BackColor = 0xFF0000
or, we could use the symbolic constant for the blue color (vbBlue):
frmExample.BackColor = vbBlue
· It is strongly suggested that the symbolic constants be used instead of the numeric values, when possible. You should agree that vbBlue means more than the value 0xFF0000 when selecting the background color in the above example. You do not need to do anything to define the symbolic constants - they are built into Visual Basic.
Defining Your Own Constants
· You can also define your own constants for use in Visual Basic. The format for defining a constant named PI with a value 3.14159 is:
Const PI = 3.14159
· User-defined constants should be written in all upper case letters to distinguish them from variables. The scope of constants is established the same way a variables’ scope is. That is, if defined within a procedure, they are local to the procedure. If defined in the general declarations of a form, they are global to the form. To make constants global to an application, use the format:
Global Const PI = 3.14159
within the general declarations area of a module.

No comments:
Post a Comment